Tool Needed
3/64 Mini Screw Driver (the size found in an eyeglass repair kit)
Hobby Knife
Cleaners (Dawn Dish Detergent or any cleaner that removes oil and does not leave a residue)
Cutters for Metal (Xuron Track Cutters work, too)
Files/Metal Files

The MDT
Thank you for purchasing the MDT shell and chassis. Be sure to acquire the Showcase Miniatures Nn3/Z Scale Power Truck if you have not already done so.
They are available here: Showcase Miniatures.
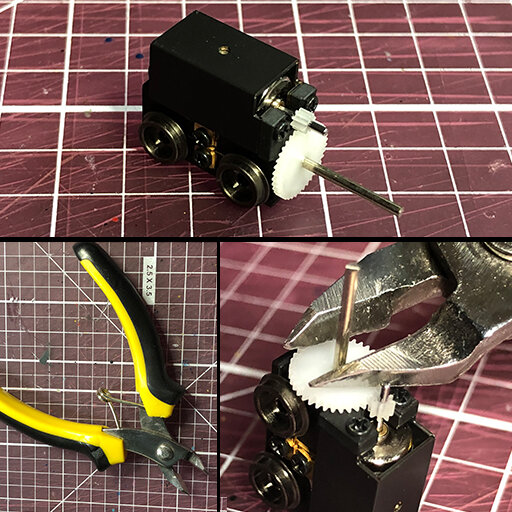
Prep the Power Truck
The power truck has two metal shafts sticking out the rear. The longer one needs to be cut. To make it easy to cut, the longer shaft is made of a softer metal than the short top one. Use your favorite cutters to chop the long shaft down. Cut as close to the large gear as possible.
NOTE: Don’t try to cut smaller the top shaft. The metal is very hard and may damage your tool. If you do choose to cut it, wear safety glasses.

It’s Ready!
Without the long shaft, the Power Truck can now fit into the MDT shell.

Step 1
Test fit the Power Truck in the shell. Make sure there is no resistance.
DO NOT FULLY INSERT IF THERE IS RESISTANCE!
The motor mount can be broken if the shell is too tight. The power truck should fit loosely into the shell. If the fit is tight, the inner part of the shell must be filed down. See Step 2.

Step 2
If the Power Truck does not fit loosely into the shell, the inner walls must be filed down. In the illustration, the area marked in blue represents the area to be filed. Work both sides of the inner shell to make room for the Power Truck.

step 3
Wash the chassis sprue. Dawn dish detergent is effective at removing unwanted materials left over from the printing process. Use an old tooth brush to scrub all surfaces.
NOTE: “Fine Detail” plastic prints from Shapeways usually have uncured resin and support material still stuck to the surface. These substances should not come into contact with the Power Truck. Also, cleaning the parts insures good adhesion of acrylic paints and/or glue.

Step 4
When the part is dry, cut one of the chassis from the sprue.
NOTE: There are three chassis included with every sprue. The extras may be needed if one chassis is broken.
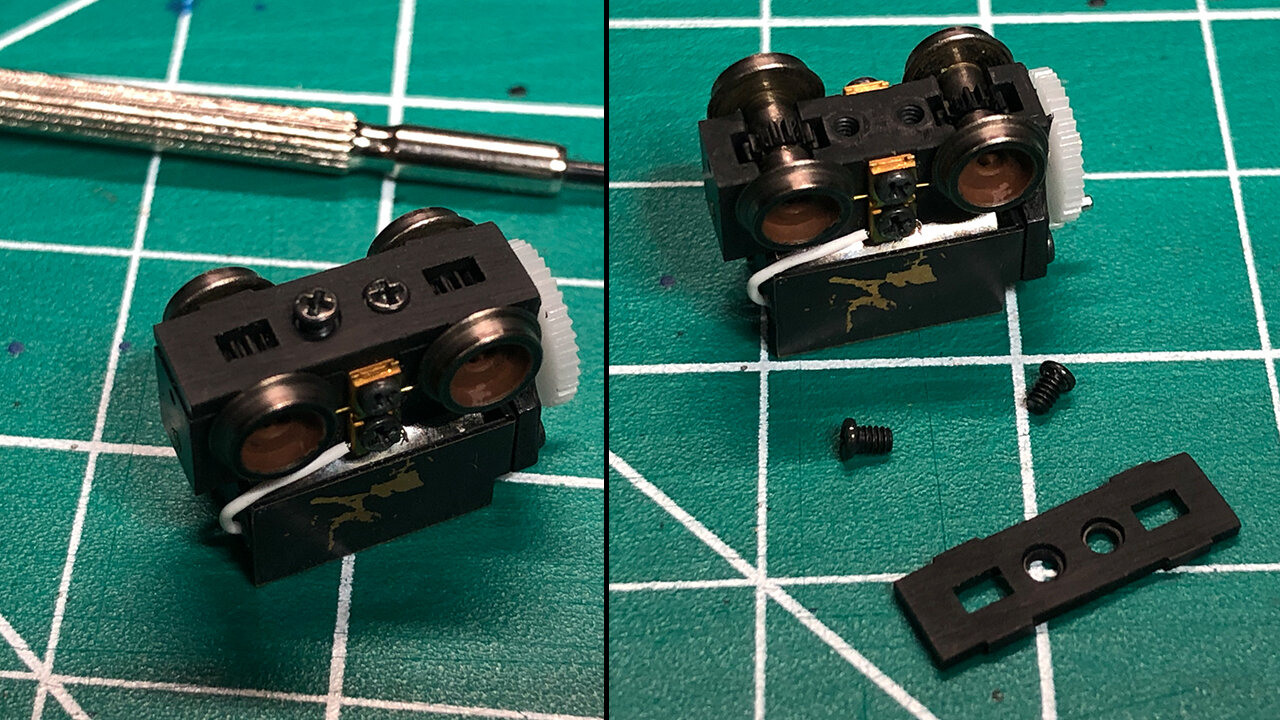
Step 5
Place the Power Truck belly up and remove the two screws holding the bottom plate.
Then remove the black bottom plate.

Step 6
Place the plastic chassis onto the Power Truck. Orient the the chassis so that the longer section of the chassis provides room for the large gear. Use the two screws to lock it into place.

Step 7
Notice the two perpendicular bars on the chassis. They are denoted in the illustration by red arrows. The two bars lock into the shell by friction. They fit into the four “L” shapes under the shell. The four “L” shapes are colored blue in the lower illustration.
Apply pressure to the crossbars to push the chassis into the shell. Do not push the center of the chassis.
If the chassis does not fit, sand the sides of the bars where the red arrows are pointing in the illustration. Be careful! You can ruin the tight fit if you sand too much.

Test Drive!
Place the locomotive on some track and take it for a spin!

Removing the Chassis
There is a lip on the front and rear of the chassis (denoted by the red arrow). Use a toothpick, screwdriver or a finger nail against the lip to pry the chassis from the shell. Pry the front and rear evenly so the chassis is not bent. The chassis could be snapped in half if it is bent too much.

add Couplers
Test fit the couplers before painting the shell.
Micro Trains Line 905 Body mount coupler will fit into the pilots of the MDT. They will stay in with friction. The fit should be snug but not so tight it inhibits the coupler’s functionality. A metal file can be used to widen the pilot hole if needed.

Painting
To paint the chassis, start by washing it. Use Dawn dish detergent (or any cleaner that removes oil and does not leave a residue) and scrub it with a brush.
Once the model is dry, apply a coat of primer made for clean metal. Once the primer is dry, any acrylic paint will do the job.
If you want to apply decals, it is highly recommended to apply a gloss coat first. Finish the model with a flat coat to protect the decals.